
Well another week has come and gone and it is time for another menu for the week. Last week I followed the menu mostly but it kind of fell apart at the end of the week. But that is how my menus usually go. The point for me is to get back into planning a menu and making real meals again. My poor family is so tired of scrounging around the house at dinner time that it is high time I get back to doing my job of feeding my family!! Here is this weeks menu. Again, if you are trying to start doing menus don't let the fear of feeling trapped by it stop you. Menus are meant to be flexible!!
Monday ~ Bistro Chicken
Tuesday ~ Grilled Veggie Pizza
Wednesday ~ Tacos
Thursday ~ Chicken Tortilla Soup
Friday ~ Meatloaf
Saturday ~ Chuckie Cheese (Becca's Birthday Choice)
Sunday ~ YoYo or Waffles
As I make these meals, I will try to come back and link to posts that give the recipe and photo. Happy Meal Planning!!
Tuesday, January 11, 2011
Tuesday, January 4, 2011
Crispy Chicken Wraps

The great thing about this recipe is that it is fast, easy and everyone loves it. Plus, it is easily adaptable to whatever your family loves. I like to make it on nights that our family has lots of places to be.
This recipe is slightly adapted from Mels Kitchen Cafe, one of my favorite food blogs.
What you will need:
1/3 cup mayonaisse
1/2 small onion, chopped fine
2 celery ribs chopped fine
2 Tlbs. sour cream
2 tsp. hot sauce
1/2 rotisserie chicken, skin discarded and meat chopped into bite size pieces
2 cups shredded cheddar cheese
Flour tortillas
What you do:
Mix the mayo, onion, celery, sour cream and hot sauce in a large bowl. Add chicken and toss to combine. Spread a small amount of chicken mixture down the middle of a tortilla. Sprinkle cheese on top of chicken mixture. Wrap tortilla like a burrito with sides folded in. Place on a hot skillet and let tortilla brown. To keep the tortilla from opening up, start with the seam side down. After tortilla has browned flip and brown the other side. Repeat until all chicken mixture has been used up.
This makes about 6-8 wraps for my family. The amount you will get depends on how much chicken mixture you add to each tortilla.
Monday, January 3, 2011
Weekly Meal Plan
2008...Wow, it's been a long time since I have posted anything on this blog. I am not going to apologize, because my goal this year is to be OK with imperfection, so the only thing to do is move forward.
I am also not going to make any grand promises, but I would like to start posting here more. That being said, I have an idea formulating... more on that later if it ever develops into anything, but it does have to do with posting a weekly menu and I thought I would get started now while I feel the momentum building.
If nothing else, I am hoping to get better at making my weekly menu like I used to be. I know we eat better and I spend less money when I do. It also reduces a lot of the "what should I make for dinner" stress.
The menus are not going to be glamorous. I will do my best to post recipes that I have not posted in the past or link to recipes that I have posted before. Again, no promises.
Monday ~Chicken Jumbalaya
Tuesday ~Crispy Chicken Wraps
Wednesday ~Spaghetti
Thursday ~Summer Garden Soup
Friday ~BBQ Hamburgers
Saturday ~Tilapia, Rice and Brussel Sprouts
Sunday ~YoYo (This stands for "Your On Your Own" and is basically a leftovers night)
Of course, as with any menu this is subject to change if I have any intense cravings or if my husband and I decide to go on a date or something, but for the most part, this is what we will eat this week.
One thing I will try to do when planning my menus is have at least one night with fish (this means we will be eating a lot of tilapia because it is the cheapest kind to feed a family of 6 with), one night that has no meat and one night that is YoYo.
Please post your menu in the comments section and hopefully we can all help each other out with the dinner rut!
Friday, November 21, 2008
Thanksgiving Tips
Holidays are right around the corner and I am so excited! Thanksgiving is one of my favorite holidays because I love to cook and feed people so this is right up my ally.
Unfortunately you are all going to have to wait until after Thanksgiving to see the food I serve up. I will take pictures as I make it but I am unable to do a preview. I can however, give you a list of all the food I prepare and give you as many time saving tips as I can.
I have been doing Thanksgiving dinner on my own for 6 years now, and doing a friend Thanksgiving dinner separate from the one we had on Thanksgiving day with family for about 5 years before that. So all total, 11 years of planning and putting together Thanksgiving dinners! Here are some things I have learned over the years.
First, have a plan. Know what you want to serve and get your grocery list prepared well in advance. I personally like to make the same dishes each year with only slight variation depending on who is joining us. I have a master dinner plan made up in Excel that lists all the menu items and then a detailed shopping list below. Each year all I have to do is print it off and take it to the store. This is a sure fire way to make sure you remember everything at the store. There is nothing more frustrating than preparing all your food on Thanksgiving day only to realize that you have forgotten something at the store. It can really put a crimp in your food prep plans.
Here is my menu for those interested.
Turkey/Gravy
Stuffing (A fabulous homemade stuffing!)
Mashed Potatoes
Broccoli Casserole
Cherry Jello Salad
Pie (Pumpkin, Blackberry and Banana Cream this year)
Celery with Cheesewhiz (a family tradition)
Sweet Potatoes
Brussel Sprouts (Something new this year, but my family loves them so it will be a hit)
Veggie Tray
This may sound like a fairly simple menu, but it is packed with traditional foods that both my husband and I grew up with. We love it. Isn't that what it is all about? It isn't necessary to create a bunch of gourmet food that you see on Food Network that nobody will love. By all means, make the new recipes if you think your family will love them, but don't feel you have to just to be considered a "great cook"
Another time saving tip is to buy all non-perishable items early. I have already purchased my non-perishable items. I have had one too many times where I have waited until the week of Thanksgiving to purchase items and have them completely gone. It is frustrating to have to go from store to store trying to find the one or two items that everyone else wants.
We always decorate and set the table the night before. This allows us to really take time to make the table beautiful and we don't have to worry about it during the food prep crunch the next day.
I like to do all my chopping the day before. This saves loads of time. I will also make my pies and jello salad the day before. I think I will also make the roll dough and let it rise in the fridge over night. Always try to do the things ahead of time that you can. But don't do things that will actually set you back. One year I made the broccoli casserole and sweet potato casserole the day before, I had to let them come to room temp before I could cook them in the oven or my baking stone would crack. Normally it wouldn't have been a problem but I had forgotten to take them out of the fridge until it was time to cook. This set us back farther than if I had just made them the day of.
Unfortunately I don't have 2 ovens. This proves to be the trickiest part of my Thanksgiving cooking. In the past, I have had other families for dinner. I usually assign out the rolls, and pies so I don't have to use my oven to cook them up. This year, I am doing the whole thing on my own. I am still trying to figure out how to cook everything in my one small oven. Sadly, the people who remodeled the kitchen right before we purchased our home bought high quality appliances but the oven they chose is so small!! I can only just fit the turkey in it. I usually cook it first and then let it rest while I try to cram as many other things in the oven to cook as possible. It will be tricky because we all love hot rolls so I am going to have to time it really well. Luckily I have a warmer drawer under the oven to keep the rolls warm and any other food that needs to wait to be served.
My last tip for today is to try and have a sou chef. This is my husband. He knows that his job is to do whatever it is that I need to have done. Most of the time he just cleans up after me which is a true life saver. Some times he just keeps the kids out of my hair. Other times he chops things for me. And he always gets to do the table decoration with the kids. They really get into it and make a nice center piece using fresh apples, oranges, mini pumpkins, gourds, branches from the yard and candles. I will be sure to post a pic of this years creation.
I hope this helps some of you first time Thanksgiving hosts out there. If I think of any more time saving tips as I go through my routine, I will update. I will be posting recipes and pictures as I create my dishes.
Thursday, November 13, 2008
Poor Man Meal Series Post 3: Goulash

This is a meal I ate growing up and actually hated, but now I love it! I don't really know why I hated it because their isn't anything that is unkid-friendly, I was just picky I guess.
There are all sorts of ways you can spice this recipe up, by adding extra spices or even cheese, but I like it basic. Unlike me as a kid, all my kids love this dish! Every time I make it, I think of home.
What you will need:
1 lb. Hamburger
12 oz. Elbow Macaroni
2 cans Stewed Tomatoes
Onion Powder (to taste)
Garlic Powder (to taste)
Salt (to taste)
Pepper (to taste)
What you do:
Start a pot of water to boil. Cook macaroni according to package directions. Meanwhile, brown hamburger. Add tomatoes and let them cook down a bit. Season to taste. Mix with macaroni. Serve with hot homemade bread and a side veggie for a full meal.
Monday, October 13, 2008
Poor Man Meal Series Post 2: Hot Dog Boats

Hot dog boats were a childhood favorite of mine. It is something I got rarely, so when I did it was such a fun treat! I actually find them easy to make and serve them to my kids for lunches occasionally. My husband doesn't really like them, so it is also something we eat when he is out of town and I want to be lazy. Now, just like my other post, you can go the easy route and do instant potatoes, but I always make real mashed potatoes. See my Potatoes and Hamburger Gravy post for instructions on making mashed potatoes. Also, use what ever kind of hot dog you love. Turkey dogs are a great more healthful option. Not all inexpensive meals have to be unhealthy. Here you go, the easy directions.
What you do:
Slice hot dog down the middle length wise. Put potatoes on hot dog. Top with cheddar cheese. Cook in a 350 degree oven until cheese is melted and hot dogs are browned. Easy!
Friday, October 10, 2008
Poor Man Meal Series Post 1: Mashed Potatoes with Hamburger Gravy

This is a meal I learned to make when I worked at the preschool while I was going to college. It was frequently served at lunch time. I added a few things to my recipe, like cheese, while still keeping it cheap. It is a very simple meal but it is ultimate comfort food. I don't know why I love this dish, but I do. I am sure it has something to do with my addiction with carbs. You could take the easy way out and use instant potatoes and store bought gravy, but I like to make mine from scratch.
I know that it may seem basic, but I have readers of all cooking levels and so I am going to post "how to" directions to make homemade mashed potatoes.
Homemade Mashed Potatoes
What you need:
Potatoes
Milk, cream or sour cream
Butter
Salt
What you do:
Peel potatoes, you can leave a little of the peel on if you are using red potatoes. Cut potatoes in bite size pieces. Place in boiling water and cook until tender. Don't overcook or you will have soggy mashed potatoes. Just cook until a fork can be pierced through easily. Drain potatoes. Place potatoes in a bowl and mash with a potato masher. Add butter, salt and milk, cream or sour cream (please don't use leftover potato water... yuck!). The proportions are what ever you like best. I like mine a little more buttery, so I use lots of butter. Normally I use milk and save the sour cream for special occasions. I rarely use cream because I don't notice much added flavor but the added calories are significant.
Tip: If you mix the potatoes too much, they will start to get stiff and gluey... be careful to mash them and mix in the other ingredients just until done, no need to keep stirring!
Hamburger Gravy
What you need for 2 cups of gravy:
1/2 lb. hamburger
2 tlbs. flour
2 cups beef broth
Salt and Pepper to taste
What you do:
Brown hamburger. Add a little butter if needed (if there isn't at least 2 tlbs. fat left from hamburger). Add flour and stir until hamburger is coated. Add beef broth and stir until flour is all mixed in and broth starts to thicken. Salt and pepper to taste.
Serve over potatoes and add grated cheddar cheese on top.
Tip: I make this often with left over roast broken into bite sized pieces instead of hamburger.

Poor Man Meal Series
I got a comment on my "poor man meal" that I posted a while back. You remember, fritoes and rice. Well, when I visited rubybean77's site brokenyolks she had a great post featuring an altered version of my fritoes and rice. She made some good comments about the current state of the economy and connected it to the cost of our meals. I am sure that most Americans are feeling the economic crunch in one way or another. That post has inspired me to do a complete series of "poor man meals." These are meals that I made quite frequently when I was a poor college student and also when I was newly married. Revisiting these recipes has been fun and has brought back many memories. I hope that you can find a way to incorporate these into your weeknight cooking and maybe you can stretch you dollar a little farther. Check out my "taco soup" recipe for an updated photo.
Thursday, October 9, 2008
I WON AN AWARD!!!

I truly never thought this day would happen. I have been reading food blogs now for about 2-3 months and about that long since I started revamping this one. I see blog awards all the time on other more established well known blogs. I really thought it was for blogs out of my league. It is such an honor to receive my first award!
The award comes from Marisa over at What's For Dinner. I have only recently found her blog and it quickly became one of my favorites. It seems that every recipe that she posts is one that I would love to try. You really should go check out her blog if you enjoy reading this one. Here are my picks to pass on this award to. Really, I would love to send this award right back to Marisa because I too think her blog is Excellent! I hope it is OK for me to choose some of the same blogs that Marisa picked.
My Kitchen Cafe
Hot Off The Garlic Press
Dozen Flours
Simple Mom
The Simple Marriage Project
The Recipe Girl
Picky Palate
Meck Mom
Gourmet Mom on the Go
Everyday Food Storage
Here are the rules:** Please find at least 10 more blogs, of any kind that you love to read. Write a post about the blogs you picked, linking back to me and to them. Once you’ve posted, return here to let me know your post is done and be sure to let them know too!!! (If you don't come up with 10, that's fine too!).
Friday, September 26, 2008
Adopt A Blogger

Kristen over at dine and dish is hosting an Adopt a Blogger event. I feel lucky enough that I was able to catch it right before the event started. I have been paired up with a veteran blogger who is helping me to get this little ole food blog out in the cyber world.
My mentor is Megan from Megans Cookin. She has been great. Not only has she answered every question I have had, but she has really helped to get more traffic to my site. I totally appreciate her help. You should check out her site. She has some very interesting and yummy looking food. She just reciently posted a spectacular looking cake recipe that I am certainly going to try. It is called Mexican Brown Sugar Pound Cake. I love that she is so willing to try new and creative recipes with ingredients that are uncommon. It makes cooking for us foodies so much fun!
Thursday, September 11, 2008
Granola Bars

I have seen lots of homemade granola bar recipes on lots of different sites. Some look way too hard and have too many specialty ingredients so it really wouldn't be saving me any money, but there are a few that look really promising. This is one of them. I got it from Safely Gathered In, a great website dedicated to food storage and preparedness. This recipe is great because it uses only food storage items.
What you will need:
1/2 cup brown sugar
1/2 cup Karo syrup
1/2 cup peanut butter
1 tsp. vanilla
2 cups quick oats
2 1/2 cups rice krispys
Optional: chocolate chips, almonds, raisins
What you do:
Add brown sugar and Karo syrup to a heavy bottom pan. Cook over medium heat until mixture continues to boil even when stirred. Take off heat. Add peanut butter and vanilla until all melted in. Add oats and rice cereal. Stir until all coated evenly. Let cool before adding any optional add ins.
I added mini semi sweet chocolate chips and did it before it cooled enough so they melted. It still tasted delicious! This is a very economical and fast recipe. I don't see myself buying store bought granola bars again.
Tuesday, September 9, 2008
Rotisserie Chicken
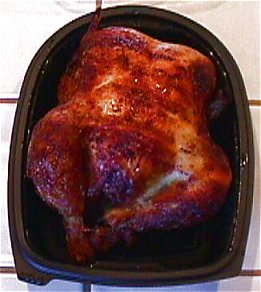
One of my new favorite things are rotisserie chickens from Sams Club. They are so convenient for weeknight cooking.
What I do is buy one and let it cool on the counter long enough for me to take all the meat off without burning my fingers.
I separate the meat into two Ziploc baggies. Half the chicken in each bag. Then during the week when I am making a quick meal the chicken is already cooked and mostly chopped. All I do is quickly defrost one baggie in the microwave and add it to any dish that calls for chicken. I love it because it not only saves me time but tastes great too! You also can't beat the price, $4.98 for 2 meals is great!
My Homemade Spaghetti Sauce

My mom always made spaghetti sauce at home. I loved it! When I was little I wouldn't eat any other spaghetti but hers. We never used the jar kind. After Cody and I got married, he made me spaghetti for dinner one night. He used a recipe that he made for his mom one time when she was sick. It was so good and I was converted. It was actually easy for me to convert to this new recipe because my mom's didn't have any measurements and I could never make it as good as her. Now I get a sweet trip down memory lane every time I visit home. We used Cody's recipe for all of our spaghetti dinners after that first time he made dinner for me. Through the years I have adjusted and changed the recipe to fit my emerging cooking abilities. This is the recipe it has evolved into over time.
What you will need:
1/2 lb. hamburger
1/2 onion chopped
1 tsp. oregano
1 tsp. basil
1 1/2 tsp. chili powder
1 tsp. sugar
1 tsp. salt
1 14 oz. can stewed tomatoes
1 8 oz. can tomato sauce
1 clove garlic pressed
What you will do:
Brown hamburger. Add stewed tomatoes and tomato sauce. Add seasonings. Saute onion in a small amount of olive oil in separate pan. When onions are tender add garlic and cook until garlic is fragrant. (don't over cook the garlic or it will become bitter) Add to sauce. Let simmer 5 to 10 minutes depending on how thick you like your sauce. The longer it simmers the thicker it will be.
I use this with spaghetti and have also used it for lasagna. It is a great versatile sauce.
Monday, September 8, 2008
Banana Bread


I got this recipe a long time ago from someone doing the 12 days of Christmas to us. They left some banana bread on the door step and it was the most wonderful moist banana bread I had ever had. We left a note on our door the next day asking for the recipe. It was given to us anonymously. I have only changed one thing. I add cinnamon.
What you will need:
1 1/2 cups sugar
3/4 cup shortening
2 eggs
1 tsp. vanilla
1 cup sour cream
2 large ripe bananas
1 tsp. baking soda
1/2 tsp. baking powder
1/2 tsp. salt
2 1/2 cups flour
1/2 tsp. cinnamon
What you do:
Cream together the sugar and shortening. Add eggs and vanilla. Mash bananas with a fork and add along with all other ingredients.
Bake at 375 degrees for 1 hour if doing 2 large loafs, 40 minutes if doing 4 small loafs or 25 minutes if doing muffins. I always like to do the muffins or small loafs because I don't like the dark hard crust the bread gets when doing large loafs.
These were moist and delicious and I couldn't keep my kids away from them.

Tuesday, September 2, 2008
Blackberry Pie

I love pies. I think I learned to love them so much because of my grandpa. I can remember that he always had pie for his birthday instead of cake. One time, we were all over at his house celebrating his birthday and my grandma was serving pie. She set a piece down between me and my grandpa and I started eating away. After I was about half way done with the piece, my grandma tried to hand me my piece of pie... I had accidentally taken the slice that was meant for my grandpa. I was so embarrassed. But I think it was the start of a beautiful love affair I have with pies.
Since I have been married, I have always tried to find great little pie shops so I can indulge my cravings every now and then. Since we have lived in Indiana, I have not been able to find a great pie shop. So after many months of not having great pies to eat, I decided that it was high time I learned how to make my own pies.
This past week I have been making pies like crazy. The first pie I made was a lemon meringue pie. Of course I would try to tackle one of the harder pies first. Needless to say, it didn't come out as wonderfully as my second pie attempt. Watch for a post on my lemon meringue fiascoes later on. The second pie I made was blackberry pie. I was able to get some perfectly sweet blackberries at the farmers market and I knew I wanted to try to make a pie with them. I had once long ago made a blackberry pie because I was assigned a pie for a potluck I was invited to. The flavor of it was good, but it was extremely runny. I didn't attempt a berry pie again until now. That was about 10 years ago!
When I made this pie I decided to use the same recipe I used 10 years ago, but I added some extra corn starch to help thicken it up. Here is the recipe for a 9" deep dish pie.
What you will need:
1 recipe for pie crust (recipe to follow)
1 1/4 cup sugar
1/4 cup flour
1/4 tsp. salt
4 cups blackberries
2 tlbs. cornstarch
What you do:
Make crust according to directions below. Put one crust in the bottom of a deep dish pie plate. Combine the sugar, flour, salt and cornstarch. Pour over blackberries. Toss gently to coat. Place remaining crust over top cutting slits to vent. Bake at 375 degrees for about 20 minutes with foil covering the outer crust to prevent it from getting to dark. Remove foil and cook another 25-30 minutes. Remove from oven and let cool.
I sliced into the pie before it was all the way cool and found that the sauce was slightly runny still, but not nearly as runny as the first time I made it. Once all the way cool, the sauce wasn't runny at all.


Pie Crust (Double Crust Recipe)
I just used the recipe found in my better homes and gardens cookbook. I know that there are fabulous pie crust recipes out there. I am sure that once I get the hang of making pie crust I will want to venture out and try all sorts of new amazing crust recipes. Until then, this one was pretty darn good.
What you will need:
2 cups flour
1/2 tsp. salt
2/3 cup shortening
6 to 7 tablespoons ice water
What you do:
Measure the shortening and then place it in the freezer to firm up as much as possible. Stir together the flour and salt with a whisk. Add the cold shortening to the flour using a pastry blender until the shortening pieces are pea sized. Sprinkle 1 tablespoon of ice cold water over the mixture and toss with a fork. Move the moistened dough over to the side of the bowl. Repeat with more water until all the dough is moist. Try to use as little water as possible. You only want enough to just keep the dough to stick together in a ball. Don't let the dough get soggy.
Put the dough wrapped in plastic wrap in the fridge for about 20 minutes to let the flour hydrate and to keep the shortening cold. Keeping all the ingredients as cold as possible is the secret to a light flaky crust.
After refrigeration, divide dough in half and roll out to a 12" circle. Place on bottom of pie plate by folding dough in half over rolling pin and laying it gently on pie plate. Be careful not to stretch the dough. Fill pie dish with filling. Roll out remaining dough, cut slits, place on top of pie filling. Tuck edges under and crimp to make a decorative edge. Bake according to pie directions.

Subscribe to:
Posts (Atom)


