
Holidays are right around the corner and I am so excited! Thanksgiving is one of my favorite holidays because I love to cook and feed people so this is right up my ally.
Unfortunately you are all going to have to wait until after Thanksgiving to see the food I serve up. I will take pictures as I make it but I am unable to do a preview. I can however, give you a list of all the food I prepare and give you as many time saving tips as I can.
I have been doing Thanksgiving dinner on my own for 6 years now, and doing a friend Thanksgiving dinner separate from the one we had on Thanksgiving day with family for about 5 years before that. So all total, 11 years of planning and putting together Thanksgiving dinners! Here are some things I have learned over the years.
First, have a plan. Know what you want to serve and get your grocery list prepared well in advance. I personally like to make the same dishes each year with only slight variation depending on who is joining us. I have a master dinner plan made up in Excel that lists all the menu items and then a detailed shopping list below. Each year all I have to do is print it off and take it to the store. This is a sure fire way to make sure you remember everything at the store. There is nothing more frustrating than preparing all your food on Thanksgiving day only to realize that you have forgotten something at the store. It can really put a crimp in your food prep plans.
Here is my menu for those interested.
Turkey/Gravy
Stuffing (A fabulous homemade stuffing!)
Mashed Potatoes
Broccoli Casserole
Cherry Jello Salad
Pie (Pumpkin, Blackberry and Banana Cream this year)
Celery with Cheesewhiz (a family tradition)
Sweet Potatoes
Brussel Sprouts (Something new this year, but my family loves them so it will be a hit)
Veggie Tray
This may sound like a fairly simple menu, but it is packed with traditional foods that both my husband and I grew up with. We love it. Isn't that what it is all about? It isn't necessary to create a bunch of gourmet food that you see on Food Network that nobody will love. By all means, make the new recipes if you think your family will love them, but don't feel you have to just to be considered a "great cook"
Another time saving tip is to buy all non-perishable items early. I have already purchased my non-perishable items. I have had one too many times where I have waited until the week of Thanksgiving to purchase items and have them completely gone. It is frustrating to have to go from store to store trying to find the one or two items that everyone else wants.
We always decorate and set the table the night before. This allows us to really take time to make the table beautiful and we don't have to worry about it during the food prep crunch the next day.
I like to do all my chopping the day before. This saves loads of time. I will also make my pies and jello salad the day before. I think I will also make the roll dough and let it rise in the fridge over night. Always try to do the things ahead of time that you can. But don't do things that will actually set you back. One year I made the broccoli casserole and sweet potato casserole the day before, I had to let them come to room temp before I could cook them in the oven or my baking stone would crack. Normally it wouldn't have been a problem but I had forgotten to take them out of the fridge until it was time to cook. This set us back farther than if I had just made them the day of.
Unfortunately I don't have 2 ovens. This proves to be the trickiest part of my Thanksgiving cooking. In the past, I have had other families for dinner. I usually assign out the rolls, and pies so I don't have to use my oven to cook them up. This year, I am doing the whole thing on my own. I am still trying to figure out how to cook everything in my one small oven. Sadly, the people who remodeled the kitchen right before we purchased our home bought high quality appliances but the oven they chose is so small!! I can only just fit the turkey in it. I usually cook it first and then let it rest while I try to cram as many other things in the oven to cook as possible. It will be tricky because we all love hot rolls so I am going to have to time it really well. Luckily I have a warmer drawer under the oven to keep the rolls warm and any other food that needs to wait to be served.
My last tip for today is to try and have a sou chef. This is my husband. He knows that his job is to do whatever it is that I need to have done. Most of the time he just cleans up after me which is a true life saver. Some times he just keeps the kids out of my hair. Other times he chops things for me. And he always gets to do the table decoration with the kids. They really get into it and make a nice center piece using fresh apples, oranges, mini pumpkins, gourds, branches from the yard and candles. I will be sure to post a pic of this years creation.
I hope this helps some of you first time Thanksgiving hosts out there. If I think of any more time saving tips as I go through my routine, I will update. I will be posting recipes and pictures as I create my dishes.
Friday, November 21, 2008
Thursday, November 13, 2008
Poor Man Meal Series Post 3: Goulash

This is a meal I ate growing up and actually hated, but now I love it! I don't really know why I hated it because their isn't anything that is unkid-friendly, I was just picky I guess.
There are all sorts of ways you can spice this recipe up, by adding extra spices or even cheese, but I like it basic. Unlike me as a kid, all my kids love this dish! Every time I make it, I think of home.
What you will need:
1 lb. Hamburger
12 oz. Elbow Macaroni
2 cans Stewed Tomatoes
Onion Powder (to taste)
Garlic Powder (to taste)
Salt (to taste)
Pepper (to taste)
What you do:
Start a pot of water to boil. Cook macaroni according to package directions. Meanwhile, brown hamburger. Add tomatoes and let them cook down a bit. Season to taste. Mix with macaroni. Serve with hot homemade bread and a side veggie for a full meal.
Monday, October 13, 2008
Poor Man Meal Series Post 2: Hot Dog Boats

Hot dog boats were a childhood favorite of mine. It is something I got rarely, so when I did it was such a fun treat! I actually find them easy to make and serve them to my kids for lunches occasionally. My husband doesn't really like them, so it is also something we eat when he is out of town and I want to be lazy. Now, just like my other post, you can go the easy route and do instant potatoes, but I always make real mashed potatoes. See my Potatoes and Hamburger Gravy post for instructions on making mashed potatoes. Also, use what ever kind of hot dog you love. Turkey dogs are a great more healthful option. Not all inexpensive meals have to be unhealthy. Here you go, the easy directions.
What you do:
Slice hot dog down the middle length wise. Put potatoes on hot dog. Top with cheddar cheese. Cook in a 350 degree oven until cheese is melted and hot dogs are browned. Easy!
Friday, October 10, 2008
Poor Man Meal Series Post 1: Mashed Potatoes with Hamburger Gravy

This is a meal I learned to make when I worked at the preschool while I was going to college. It was frequently served at lunch time. I added a few things to my recipe, like cheese, while still keeping it cheap. It is a very simple meal but it is ultimate comfort food. I don't know why I love this dish, but I do. I am sure it has something to do with my addiction with carbs. You could take the easy way out and use instant potatoes and store bought gravy, but I like to make mine from scratch.
I know that it may seem basic, but I have readers of all cooking levels and so I am going to post "how to" directions to make homemade mashed potatoes.
Homemade Mashed Potatoes
What you need:
Potatoes
Milk, cream or sour cream
Butter
Salt
What you do:
Peel potatoes, you can leave a little of the peel on if you are using red potatoes. Cut potatoes in bite size pieces. Place in boiling water and cook until tender. Don't overcook or you will have soggy mashed potatoes. Just cook until a fork can be pierced through easily. Drain potatoes. Place potatoes in a bowl and mash with a potato masher. Add butter, salt and milk, cream or sour cream (please don't use leftover potato water... yuck!). The proportions are what ever you like best. I like mine a little more buttery, so I use lots of butter. Normally I use milk and save the sour cream for special occasions. I rarely use cream because I don't notice much added flavor but the added calories are significant.
Tip: If you mix the potatoes too much, they will start to get stiff and gluey... be careful to mash them and mix in the other ingredients just until done, no need to keep stirring!
Hamburger Gravy
What you need for 2 cups of gravy:
1/2 lb. hamburger
2 tlbs. flour
2 cups beef broth
Salt and Pepper to taste
What you do:
Brown hamburger. Add a little butter if needed (if there isn't at least 2 tlbs. fat left from hamburger). Add flour and stir until hamburger is coated. Add beef broth and stir until flour is all mixed in and broth starts to thicken. Salt and pepper to taste.
Serve over potatoes and add grated cheddar cheese on top.
Tip: I make this often with left over roast broken into bite sized pieces instead of hamburger.

Poor Man Meal Series
I got a comment on my "poor man meal" that I posted a while back. You remember, fritoes and rice. Well, when I visited rubybean77's site brokenyolks she had a great post featuring an altered version of my fritoes and rice. She made some good comments about the current state of the economy and connected it to the cost of our meals. I am sure that most Americans are feeling the economic crunch in one way or another. That post has inspired me to do a complete series of "poor man meals." These are meals that I made quite frequently when I was a poor college student and also when I was newly married. Revisiting these recipes has been fun and has brought back many memories. I hope that you can find a way to incorporate these into your weeknight cooking and maybe you can stretch you dollar a little farther. Check out my "taco soup" recipe for an updated photo.
Thursday, October 9, 2008
I WON AN AWARD!!!

I truly never thought this day would happen. I have been reading food blogs now for about 2-3 months and about that long since I started revamping this one. I see blog awards all the time on other more established well known blogs. I really thought it was for blogs out of my league. It is such an honor to receive my first award!
The award comes from Marisa over at What's For Dinner. I have only recently found her blog and it quickly became one of my favorites. It seems that every recipe that she posts is one that I would love to try. You really should go check out her blog if you enjoy reading this one. Here are my picks to pass on this award to. Really, I would love to send this award right back to Marisa because I too think her blog is Excellent! I hope it is OK for me to choose some of the same blogs that Marisa picked.
My Kitchen Cafe
Hot Off The Garlic Press
Dozen Flours
Simple Mom
The Simple Marriage Project
The Recipe Girl
Picky Palate
Meck Mom
Gourmet Mom on the Go
Everyday Food Storage
Here are the rules:** Please find at least 10 more blogs, of any kind that you love to read. Write a post about the blogs you picked, linking back to me and to them. Once you’ve posted, return here to let me know your post is done and be sure to let them know too!!! (If you don't come up with 10, that's fine too!).
Friday, September 26, 2008
Adopt A Blogger

Kristen over at dine and dish is hosting an Adopt a Blogger event. I feel lucky enough that I was able to catch it right before the event started. I have been paired up with a veteran blogger who is helping me to get this little ole food blog out in the cyber world.
My mentor is Megan from Megans Cookin. She has been great. Not only has she answered every question I have had, but she has really helped to get more traffic to my site. I totally appreciate her help. You should check out her site. She has some very interesting and yummy looking food. She just reciently posted a spectacular looking cake recipe that I am certainly going to try. It is called Mexican Brown Sugar Pound Cake. I love that she is so willing to try new and creative recipes with ingredients that are uncommon. It makes cooking for us foodies so much fun!
Thursday, September 11, 2008
Granola Bars

I have seen lots of homemade granola bar recipes on lots of different sites. Some look way too hard and have too many specialty ingredients so it really wouldn't be saving me any money, but there are a few that look really promising. This is one of them. I got it from Safely Gathered In, a great website dedicated to food storage and preparedness. This recipe is great because it uses only food storage items.
What you will need:
1/2 cup brown sugar
1/2 cup Karo syrup
1/2 cup peanut butter
1 tsp. vanilla
2 cups quick oats
2 1/2 cups rice krispys
Optional: chocolate chips, almonds, raisins
What you do:
Add brown sugar and Karo syrup to a heavy bottom pan. Cook over medium heat until mixture continues to boil even when stirred. Take off heat. Add peanut butter and vanilla until all melted in. Add oats and rice cereal. Stir until all coated evenly. Let cool before adding any optional add ins.
I added mini semi sweet chocolate chips and did it before it cooled enough so they melted. It still tasted delicious! This is a very economical and fast recipe. I don't see myself buying store bought granola bars again.
Tuesday, September 9, 2008
Rotisserie Chicken
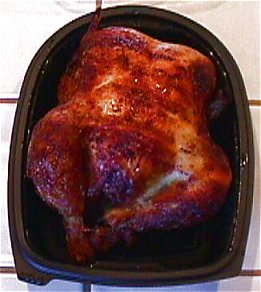
One of my new favorite things are rotisserie chickens from Sams Club. They are so convenient for weeknight cooking.
What I do is buy one and let it cool on the counter long enough for me to take all the meat off without burning my fingers.
I separate the meat into two Ziploc baggies. Half the chicken in each bag. Then during the week when I am making a quick meal the chicken is already cooked and mostly chopped. All I do is quickly defrost one baggie in the microwave and add it to any dish that calls for chicken. I love it because it not only saves me time but tastes great too! You also can't beat the price, $4.98 for 2 meals is great!
My Homemade Spaghetti Sauce

My mom always made spaghetti sauce at home. I loved it! When I was little I wouldn't eat any other spaghetti but hers. We never used the jar kind. After Cody and I got married, he made me spaghetti for dinner one night. He used a recipe that he made for his mom one time when she was sick. It was so good and I was converted. It was actually easy for me to convert to this new recipe because my mom's didn't have any measurements and I could never make it as good as her. Now I get a sweet trip down memory lane every time I visit home. We used Cody's recipe for all of our spaghetti dinners after that first time he made dinner for me. Through the years I have adjusted and changed the recipe to fit my emerging cooking abilities. This is the recipe it has evolved into over time.
What you will need:
1/2 lb. hamburger
1/2 onion chopped
1 tsp. oregano
1 tsp. basil
1 1/2 tsp. chili powder
1 tsp. sugar
1 tsp. salt
1 14 oz. can stewed tomatoes
1 8 oz. can tomato sauce
1 clove garlic pressed
What you will do:
Brown hamburger. Add stewed tomatoes and tomato sauce. Add seasonings. Saute onion in a small amount of olive oil in separate pan. When onions are tender add garlic and cook until garlic is fragrant. (don't over cook the garlic or it will become bitter) Add to sauce. Let simmer 5 to 10 minutes depending on how thick you like your sauce. The longer it simmers the thicker it will be.
I use this with spaghetti and have also used it for lasagna. It is a great versatile sauce.
Monday, September 8, 2008
Banana Bread


I got this recipe a long time ago from someone doing the 12 days of Christmas to us. They left some banana bread on the door step and it was the most wonderful moist banana bread I had ever had. We left a note on our door the next day asking for the recipe. It was given to us anonymously. I have only changed one thing. I add cinnamon.
What you will need:
1 1/2 cups sugar
3/4 cup shortening
2 eggs
1 tsp. vanilla
1 cup sour cream
2 large ripe bananas
1 tsp. baking soda
1/2 tsp. baking powder
1/2 tsp. salt
2 1/2 cups flour
1/2 tsp. cinnamon
What you do:
Cream together the sugar and shortening. Add eggs and vanilla. Mash bananas with a fork and add along with all other ingredients.
Bake at 375 degrees for 1 hour if doing 2 large loafs, 40 minutes if doing 4 small loafs or 25 minutes if doing muffins. I always like to do the muffins or small loafs because I don't like the dark hard crust the bread gets when doing large loafs.
These were moist and delicious and I couldn't keep my kids away from them.

Tuesday, September 2, 2008
Blackberry Pie

I love pies. I think I learned to love them so much because of my grandpa. I can remember that he always had pie for his birthday instead of cake. One time, we were all over at his house celebrating his birthday and my grandma was serving pie. She set a piece down between me and my grandpa and I started eating away. After I was about half way done with the piece, my grandma tried to hand me my piece of pie... I had accidentally taken the slice that was meant for my grandpa. I was so embarrassed. But I think it was the start of a beautiful love affair I have with pies.
Since I have been married, I have always tried to find great little pie shops so I can indulge my cravings every now and then. Since we have lived in Indiana, I have not been able to find a great pie shop. So after many months of not having great pies to eat, I decided that it was high time I learned how to make my own pies.
This past week I have been making pies like crazy. The first pie I made was a lemon meringue pie. Of course I would try to tackle one of the harder pies first. Needless to say, it didn't come out as wonderfully as my second pie attempt. Watch for a post on my lemon meringue fiascoes later on. The second pie I made was blackberry pie. I was able to get some perfectly sweet blackberries at the farmers market and I knew I wanted to try to make a pie with them. I had once long ago made a blackberry pie because I was assigned a pie for a potluck I was invited to. The flavor of it was good, but it was extremely runny. I didn't attempt a berry pie again until now. That was about 10 years ago!
When I made this pie I decided to use the same recipe I used 10 years ago, but I added some extra corn starch to help thicken it up. Here is the recipe for a 9" deep dish pie.
What you will need:
1 recipe for pie crust (recipe to follow)
1 1/4 cup sugar
1/4 cup flour
1/4 tsp. salt
4 cups blackberries
2 tlbs. cornstarch
What you do:
Make crust according to directions below. Put one crust in the bottom of a deep dish pie plate. Combine the sugar, flour, salt and cornstarch. Pour over blackberries. Toss gently to coat. Place remaining crust over top cutting slits to vent. Bake at 375 degrees for about 20 minutes with foil covering the outer crust to prevent it from getting to dark. Remove foil and cook another 25-30 minutes. Remove from oven and let cool.
I sliced into the pie before it was all the way cool and found that the sauce was slightly runny still, but not nearly as runny as the first time I made it. Once all the way cool, the sauce wasn't runny at all.


Pie Crust (Double Crust Recipe)
I just used the recipe found in my better homes and gardens cookbook. I know that there are fabulous pie crust recipes out there. I am sure that once I get the hang of making pie crust I will want to venture out and try all sorts of new amazing crust recipes. Until then, this one was pretty darn good.
What you will need:
2 cups flour
1/2 tsp. salt
2/3 cup shortening
6 to 7 tablespoons ice water
What you do:
Measure the shortening and then place it in the freezer to firm up as much as possible. Stir together the flour and salt with a whisk. Add the cold shortening to the flour using a pastry blender until the shortening pieces are pea sized. Sprinkle 1 tablespoon of ice cold water over the mixture and toss with a fork. Move the moistened dough over to the side of the bowl. Repeat with more water until all the dough is moist. Try to use as little water as possible. You only want enough to just keep the dough to stick together in a ball. Don't let the dough get soggy.
Put the dough wrapped in plastic wrap in the fridge for about 20 minutes to let the flour hydrate and to keep the shortening cold. Keeping all the ingredients as cold as possible is the secret to a light flaky crust.
After refrigeration, divide dough in half and roll out to a 12" circle. Place on bottom of pie plate by folding dough in half over rolling pin and laying it gently on pie plate. Be careful not to stretch the dough. Fill pie dish with filling. Roll out remaining dough, cut slits, place on top of pie filling. Tuck edges under and crimp to make a decorative edge. Bake according to pie directions.

Tuesday, August 26, 2008
Mac and Cheese

I have seen lots of recipes for homemade mac and cheese on various other food blogs. It really inspired me to make my own mac and cheese. I wanted it to be new and fun but still be a true mac and cheese and not a casserole. That is why I didn't add any veggies or meat to the dish. I felt it turned out ok, but my husband loved it and made me post the recipe. I think I would have loved it more if I had followed my own directions and didn't just "eyeball" it like I did. So, here is the recipe the way it should be.
What you will need:
Flour
Milk
Butter
Pasta (I used the new mini bowtie pasta)
Cheese (I used Cheddar, Colby Jack, Motzerella, Pepper Jack and Parmesian)
Salt
Pepper
Paprika
Celery Seed
Refrigerated Cressent Rolls
What you do:
The first thing you will do is make a rue. A rue is simply a mix of equal parts butter and flour cooked together to thicken sauce. You start this way to ensure that you don't have lumps of flour in your sauce. The best way to determine how much rue you will need is to decide how much liquid you will be adding. For my 9x13 casserole dish of mac and cheese I figured I would need about 3 cups of sauce. A good ratio is 1 tlbs. flour, 1 tlbs butter to 1 cup of liquid. So for this recipe I used 3 tlbs flour, 3 tlbs butter and 3 cups milk.
First, melt the butter in a pan. Let it get nice and bubbly. Add the flour all at once and stir it in with the butter. The flour and butter will turn into a clump. Let it cook for a minute and start to brown. The darker you let it get the more flavor it will give your sauce but the less thickening power it will have. Use your judgement on how long to cook depending on how thick you like your sauce.
Add the milk all at once and whisk until rue is incorporated. Let cook until starting to thicken. Add your cheese. You can use any mix of cheese and any ratio. I used the largest portion of cheddar. I used equal portions of motzerella, pepper jack and colby jack. Let your cheese melt until smooth.
Season to taste with salt, pepper, celery seed and paprika. Pour sauce over cooked pasta and stir well. Place pasta in casserole dish.
I wanted something different for a topping. Something besides breadcrumbs or cheese. I had a can of refrigerated crescent rolls in my fridge and I cut them into little squares. I sprinkled the dough squares over the top of the pasta and then sprinkled parmesian cheese over the dough.
Bake in a 350 degree oven until sauce is bubbly and the crescent rolls are golden brown.

Thursday, August 21, 2008
French Toast

One of my favorite things that have come about from me making bread every week is that we get to use the day old (or couple days old) bread to make super yummy french toast. Now, I am not claiming to have a super amazing french toast recipe. We just make the standard french toast recipe with milk, eggs, vanilla and cinnamon. But doing it with homemade, slightly dry bread makes amazing results.
One of my families favorite ways to eat french toast is to "stuff" it with cream cheese and peaches. We haven't made it like this for awhile because we will only use fresh or bottled peaches. I haven't botteled peaches since we moved from Utah, but on Saturday I am going to be botteling them again. Peaches and cream french toast here we come!
This morning I was using up the last of a loaf of bread to make french toast and I figured that some of my faithful readers must have some great recipes for french toast. Post a comment and let me know your favorite way to eat french toast. I will make them for my family and we will recognize our favorite one in its own post. I look forward to trying some super scrumptious french toast recipes.
Chocolate Bundt Cake

This is one of the most moist, gooey chocolate cakes I have ever had. I can't begin to tell you how yummy it is. I found this recipe on one of my favorite food blogs My Kitchen Cafe and instantly had to try it. I am sorry the picture isn't the greatest. Maybe someday I will buy one of those fancy cake dishes, but until then I just use a Tupperware bowl and put the cake on the lid and the bowl over the top to keep it from drying out. That is the lovely green bottom you see in the picture. I know I will be making this cake again so, I will try to get a more fabulous picture up soon. Until then, make this recipe for yourself and see how happy you will be when you are done, and how much more you will weigh... but we won't think about that part now will we?
What you will need:
1 devils food cake mix
1 4-serving instant chocolate pudding mix
4 large eggs
1 cup sour cream
1/2 cup warm water
1/2 cup vegetable oil
1 1/2 cups chocolate chips
What you do:
Place all ingredients except chocolate chips in a large mixing bowl. Blend with an electric mixer for 1 minute. Stir down sides. Continue to mix on medium speed for 2-3 minutes. Stir in chocolate chips. Pour batter into a greased and floured bundt pan. Bake at 350 degrees for 45-50 minutes. Cool 20 minutes and then invert onto a cooling rack. Dust with powdered sugar after completely cooled. Store in an airtight container.
Wednesday, August 20, 2008
Chicken Spaghetti

A few weeks ago I first heard about chicken spaghetti. My friend and I were at the pool letting our kids play and we were discussing what to have for dinner. She said Chicken Spaghetti and I said "what?" I had never heard of it. She gave a brief description and then we continued on in our conversation. Then a couple days ago, I found a recipe on The Pioneer Woman Cooks blog for chicken spaghetti. It seemed was similar to the one my friend told me she made. I decided that it was time that I tried my hand at chicken spaghetti. This is what I came up with.
Oh, and in case you are like me and have never heard of it, chicken spaghetti is nothing more than a casserole. It isn't spaghetti with chicken instead of beef like I had originally thought. I will have to say it ranks pretty high in the comfort food department. I hope you enjoy it as much as I did.
What you will need:
1 16 oz. package angel hair pasta
2 cans cream of chicken soup
2 cans chicken broth
1 cup milk
2-3 small tomatoes cut into chunks
3-4 celery ribs cut into small pieces
1 onion chopped
1/2 rotisserie chicken taken from bone and chopped into bite sized pieces
Cheddar Cheese (1-2 cups depending on how cheesy you like it)
1 sleeve buttery crackers
1/2 cup Parmesan cheese
4 tlbs. butter
Black Pepper
Lowery's Seasoning Salt
Cayenne Pepper
What you do:
Cook the spaghetti in the two cans of chicken broth plus enough water to fill the pot. Cut up the celery, onion and tomato. Mix celery, onion, tomato, cream of chicken soup, rotisserie chicken, cheese and milk together in large bowl. Add spaghetti when cooked to just before aldente. You want it with a good bite because you will continue to cook it in the oven. Season with seasoning salt, black pepper and cayenne pepper. You can leave out the cayenne if you don't like your food with a little spice. You will want to taste the sauce to see how much seasonings you like.
If I had to guess I would say that I used about 1/8 tsp. cayenne pepper, 1 tsp. seasoning salt, and 1/2 tsp black pepper. I may have used a little more than that, but that is a good place to start from.
After seasonings are all stirred in, put in a 9x13 baking dish. Crush crackers in a bowl and add Parmesan cheese. Sprinkle over top of casserole. Cut the 4 tlbs. butter into small pieces and dot around top of crackers.
Bake in a 350 degree oven for about 20 minutes or until cheese is melty, sauce is hot and cracker crumbs are golden brown.

Tuesday, August 19, 2008
Homemade Flour Tortillas

I know I don't look it, but I am actually 1/4 mexican. My grandpa was the real tamale :). That being the case, mexican food has always been part of my diet. I LOVE mexican food. One time when we were at my dad's aunts house, I asked if I could learn how to make flour tortillas. Flour tortillas were at every extended family function that included food. These ladies were PROS! They could whip out perfectly round tortillas so fast your head would spin. I claim no such expertise. I do, however, remember a few tips that I will share with you. First the recipe.
What you will need:
4 cups flour
2 tsp. baking powder
2 tsp. baking powder
1 tsp. salt
4 tlbs. shortening
1 1/2 cups hot water
What you do:
Mix all dry ingredients together with a whisk. Add shortening by pinching it into the flour with your fingertips. Add hot water and mix until a dough forms. Again, use your hands. Let stand about 10 minutes. Pinch off small balls and set them around a space on the table with flour laid out for rolling. Let the balls of dough sit for another 10 minutes. Roll the tortillas flat and round. Cook on a very hot dry fry pan until brown spots appear. Turn over and cook other side. Keep tortillas wrapped in dish towel to keep warm.
Tips:
1. Don't use too much flour for rolling out the dough or tortillas will become too dry.
2. To get rounder tortillas, start with a round ball, press flat and roll. Turn dough 1/4 turn and roll again. Keep turning dough to keep the tortilla looking round.
3. The best rolling pin to use is actually a 1" wooden dowel cut to about 8" long. You can then keep the pressure in the middle of the dowel instead of the edges and you will get a more even tortilla
4. Thick homemade tortillas are the best. You will be tempted to leave the dough thick when rolling. Don't do this. Even at the thinnest you can roll it out, it will still be thicker than store bought. If you leave your dough too thick, you will be eating flatbread instead of tortillas.

Monday, August 18, 2008
Grilled Veggie Pizza

I got this recipe from savingdinner.com when I was a subscriber. I have changed up the veggies to fit my taste but I think I do the sauce pretty much the same. Really this concept can be played with and you can jazz it up however you like. Here is how I do it.
What you will need:
1 recipe for pizza crust (recipe to follow)
1 tlbs. olive oil
1 tlbs. balsamic vinegar
2 cloves garlic, pressed
1 tsp. dried rosemary leaves
salt and pepper to taste
1 onion cut into wedges
1 yellow squash, sliced
1 zucchini, sliced
1 jar artichoke hearts in water or brine
1 fresh tomato, cut in large chunks
mozzarella cheese, grated
You can use any pizza crust recipe. I have found the one from saving dinner to be simple and just as good as any other I have used. Here is that recipe.
3/4 cup warm water
1 tlbs olive oil
3/4 tsp salt
2 1/3 cup flour
1 1/2 tsp yeast
What you do:
To make crust: Mix all ingredients together to make a soft dough. Try to not use too much flour, especially when rolling the dough or it will be dry and tough and have a floury taste. Break dough into small balls and roll into circles. Layer dough on a pan with parchment paper separating each disk.
To make topping. Saute all veggies in a pan. If you have a grill pan, use it to saute the veggies on the grill, otherwise just saute them indoors over your stove. In a large bowl mix olive oil, balsamic vinegar, garlic, rosemary, salt and pepper with a whisk. Add sauteed veggies and mix to coat evenly.
Spray your grill with a nonstick spray. Get the grill nice and hot. Place one disk of pizza dough on grill. Add a scoop of sauteed veggies on dough. Sprinkle with mozzarella cheese. Repeat with other disks of dough until you have filled the grill. Put the lid down and let the heat get the cheese melty. Rotate the dough a quarter turn half way through the grilling. This process happens quick! Make sure you watch it so you don't burn your crust.
Enjoy!
Friday, August 15, 2008
Grandma Thorn's Basic White Bread

My grandma made bread every week. I never thought much of it growing up because it is just what she did. I loved to eat it hot out of the oven. She always gave my dad a loaf who also loved her bread. Once I got old enough to appreciate the difference between homemade and store bought bread I asked my grandma if she would teach me how to make her bread the next time she made it. Unfortunately she passed away before she ever made bread again. For years I have wished that I was able to learn from my grandma the art of her bread. She had made it for so long that the recipe wasn't written down. Every reunion and family gathering I would ask around for the recipe and nobody ever had it. Then, a few years ago I was talking to my aunt and longing for that recipe and she said "I've got it." I couldn't believe my ears! She sent me the recipe as soon as she got home. Problem was, she only sent me the ingredients. I am such a novice when it comes to making bread and I didn't even know how many times to let it rise! I set out to figure it out. This is my 3rd batch and I feel it turned out pretty darn good. My husband doesn't like a dark crust so this crust isn't as dark and chewy as my grandma's but it is pretty darn close.
What you will need:
4 1/2 tsp. yeast
1 tlbs salt
4 tlbs sugar
1/4 cup oil
3 cups hot water
Enough flour to make a soft dough
What you do:
Mix the water, yeast and sugar and let sit for a minute or so. Add the salt, oil and a couple cups flour. Let sit for 10-20 minutes or overnight in the fridge. Add the rest of the flour to make a soft do that won't stick to your hands. Don't add too much flour. Kneed in a mixer for about 5 minutes or by hand for about 15 minutes. Make sure you kneed it well to get the best bread quality. Add about a tablespoon of oil in the bottom of a large bowl. Put kneeded dough in the bowl on the oil then turn dough over. The oil helps to keep the dough from drying out. Let rise until double in a warm spot covered with a clean dish towel. After the first rise, punch down and let rise again until double. After the second rise roll the dough out and get rid of all the air bubbles. Shape into 3 loafs and put in loaf pans. Let rise again until almost double. Bake in a preheated 400 degree oven until crust is deep brown, about 40 minutes. Turn out of loaf pans immediately and let cool on a cooling rack. Let cool at least 20 minutes before cutting or the bread will squish and basically be ruined.

Thursday, August 14, 2008
Grandma Thorn's Cinnamon Rolls
 Growing up I ate lots of yummy baked goods made by my Grandma Thorn. I always took them for granted because I had never had yucky baked goods. Now that my grandma has passed and I don't live by my aunt who inherited the great baking gene from her mom, I miss the yummy goodness that I grew up with. After trying multiple recipes for cinnamon rolls and hating all of them, I had almost given up making cinnamon rolls thinking that I just didn't have the knack for it. Then, last week I was making my grandma's bread recipe and was really getting caught up in nostalgia and remembered that my grandma made great cinnamon rolls. Then I remembered that my aunt made those same great cinnamon rolls, so I called her for the recipe. It ended up being easier than I thought it would be and they turned out so good. Next time I will cook them a little less time because my husband said he liked his a little gooier. One thing I learned when talking to my aunt is that there are two basic kinds of cinnamon roll recipes out there. One is with a regular bread dough and one is with a sweet bread dough. I realized that all the recipes that I had tried and they just didn't taste sweet enough for me were made with regular bread dough and my grandma's is with a sweet bread dough. So, without further adieu here is the recipe.
What you will need:
1/4 cup warm water
2 tsp. yeast
1 cup milk
1/4 cup shortening
2 eggs
1/2 cup sugar
1 tsp. salt
enough flour to make a soft dough
Here is what you do:
Mix the warm water and yeast in a small bowl and set aside. Scald the milk and shortening in a saucepan. In the main bowl you will mix in, mix the eggs, sugar and salt. Add the milk, then add about 2 cups of flour. Add the yeast, water mixture. Continue to add flour until a soft dough forms.
Let the dough raise in a lightly coverd bowl until double in size. Roll the dough into a rectangle. Add melted butter to cover the entire rectangle of dough. Next sprinkle cinnamon over the dough and also sugar. I used brown sugar for extra goodness. I also put a thin coating of butter on the bottome of my 9x13 pan.
Roll the dough width wise making sure to keep the dough tightly rolled. Slice the dough into slices as thick as you would like. I got 12 rolls out of this recipe and they were big rolls!

Bake at 350 degrees for about 30 minutes. Glaze with your favorite icing. I tried a cream cheese icing and my family gave it two thumbs down. Next time I will use just the standard powdered sugar icing.

Saturday, August 2, 2008
Blog Updates Comming Soon
I have been doing some research on food blogs and have realized that there is a whole world out there that is very popular and new to me. It has made me want to revamp how my food blog looks and the way I do it. I have been taking photos of all my cooking and am diligently working on a new look for my blog. Please be patient and I will return shortly with lots more yummy food!
Friday, July 18, 2008
Sandwich Maker
I am probably one of the few people that didn't get a sandwich maker for my wedding. After seeing an idea on making your own corn dogs in a sandwich maker, I went out and bought one. So today for lunch I mixed up the cornbread batter, cut up the hotdogs and made these cute little triangle corndogs. Problem is, my kids didn't like them at all. They peeled off the cornbread and ate the hotdog. Feeling frustrated that I just bought this sandwich maker for nothing (and I normally don't like extra "gadgets" around my house) I thought I would experiment and see what my kids would like.
I made muffins using Jiffy muffin mix. It was fast, easy and didn't heat up my house.
I made omelettes. These were by far the biggest hit. I just took one egg, scrambled it in a small dish and then added cheese, onion, and lunch meat. I seasoned it with salt and pepper then poured it into the Pam coated sandwich maker. YUMMY!! They were so yummy that we ended up using the rest of the eggs making them. I think I will have already diced up omelette ingredients in the fridge for when school starts so Emilee can make her own omelettes before school. This will also be a much quicker breakfast for Cody before he heads off to work or the gym.
I also tried to make pocket sandwiches with leftovers. We had a chicken rice type casserole for dinner the other night that was loaded with veggies. I took two slices of bread and put the casserole in the middle then cooked it in the sandwich maker. It reminded me of a hot pocket and was actually pretty yummy.
After experimenting, I feel much better about the impulse purchase I made. I am looking forward to many more experiments that will end with fast and easy clean up without heating up the whole house. My next adventure with this machine is dessert!!
Please feel free to share your creative ideas using this cool little gadget. I am sure this post is nothing new to most of you!
Thursday, July 17, 2008
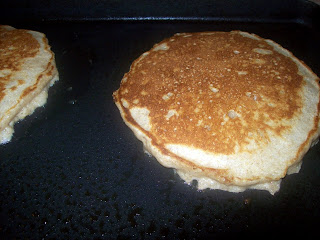
Blender Wheat Pancakes
I found this amazing site dedicated to foodstorage. We tried the blender wheat pancake recipe this morning. Granted, it isn't as delicious as the other whole wheat pancake recipe that I posted, but this is made from whole wheat kernels straight from your food storage (before they have been ground into flour) and you grind them up straight in your blender. This recipe is super fast and easy and you get a little heartier pancake.
What you will need:
1 Cup Milk
1 Cup Wheat Kernels, whole & uncooked
2 Eggs
2 tsp Baking Powder
1 1/2 tsp Salt
2 Tlbs. Oil
2 Tlbs. Honey or Sugar
What you do:
Put milk and wheat kernels in blender. Blend on highest speed for 4 or 5 minutes or until batter is smooth.
Add eggs, oil, baking powder, salt and honey or sugar to above batter. Blend on low.
Pour out batter into pancakes from the actual blender jar (only one thing to wash!) onto a hot greased or Pam prepared griddle or large frying pan. Cook; flipping pancakes when bubbles pop and create holes.
Note: I used the waffle version of this which adds a little more oil (1/4 cup) and a little less salt(1/2 tsp). I also used brown sugar instead of white.
This is probably going to be our new standard waffle recipe!
Wednesday, July 16, 2008
Muffin Tin Monday

Muffin Tin Monday is a craze that is happening around the blog world thanks to Sycamore Stirrings. I think it is a great idea and am excited to do it with my kids. Hopefully it will get my picky 2 year old to eat a better variety of food. I will post pictures next Monday. Let me know if you join the craze then post it to your blog with pictures!
Friday, June 13, 2008
Dutch Oven Potatoes and Bacon
Now that summer time is here, it is time for camping and outdoor cooking!! My family loves to cook in the dutch oven. This is one of my favorite recipes for the dutch oven.
This recipe is an "eye-ball recipe" meaning you just need to measure everything by looks. I don't have any measurements for the ingredients. You decide the proportions.
What you will need:
Bacon
Chicken
Potatoes
Carrots
Onions (optional)
Cream of chicken soup
Sprite
Salt and Pepper to taste
Cheddar cheese
What you do:
Brown bacon in the bottom of dutch oven. Or do it inside if you are short on time. Take bacon out and cook chicken till mostly done. Inside, cut up potatoes and carrots. Mix Cream of Chicken and Sprite to make it a gravy consistancy. You may want to season it with a little salt and pepper, just taste to find out. Pour gravy over potatoes and carrots till well coated. Add potato mixture to dutch oven with chicken. Cook until potatoes and carrots are tender. Add bacon at end of cooking time. Stir in grated cheddar cheese at the time you add bacon.
Potato Salad
I originally tasted this recipe when my friend Brooke made it for a dinner party we both attended. She said it was just a Betty Crocker recipe, and sure enough, I found it on her website. I make it slightly different than Brooke but not different enough to call it my own. Either way, this is my favorite potato salad recipe I have tried!
What you will need:
6 medium round red potatoes, cooked and cubed
1 1/2 cups mayo
1 tlbs. vinegar
1 tlbs. mustard
1 tsp. salt
1/4 tsp. pepper
4 hard boiled eggs, chopped
1/4 to 1/2 cup chopped dill pickles
1 med. onion (about 1/2 cup) chopped
1 cup chopped celery
papricka sprinkled on top
What you do:
Chop celery, onion and dill pickles while the potatoes and eggs cook. While potatoes and eggs cool, mix all other ingredients except papricka in a medium bowl. Stir in gently the potatoes and eggs. Sprinkle papricka on top.
This is especially good served while the potatoes are still slightly warm.
Tuesday, May 13, 2008
Whole Wheat Pancakes

I just made this for my family and they loved it! I got this recipe from an Alton Brown recipe book I own.
What you will need:
2 cups whole wheat flour
1 tsp. baking powder
1/2 tsp. baking soda
1 tsp. salt
3 tlbs. sugar
2 large eggs
2 cups buttermilk
4 tlbs. unsalted butter, melted and slightly cooled
What you do:
Mix the dry ingredients in a large bowl. Mix wet ingredients in a seperate bowl. Dump wet ingredients in dry ingredient bowl all at once. Mix until just moistened. DO NOT OVERMIX!
This is what it will look like. Real lumpy with bits of dry flour still in it.

Ladel one scoop of batter over hot griddle and cook until bubbles form in the batter and bottom is golden brown. Flip pancake and cook other side about 2 more minutes.

Tip: I used brown sugar instead of white sugar and added a bit of cinnamon. Yummy!
Tip 2: I never have buttermilk on hand so I just add one tablespoon of lemon juice per cup of milk and let it sit for a few minutes. Works great.
Tuesday, February 26, 2008
Warm Lemon Cake
If you are not signed up to get the free Kraft recipe book that gets mailed out each quarter, I highly recommend that you do. All you need to do is go to the kraft food website and sign up to get the free Food & Family recipe book. This recipe comes from that book, the winter 2007 edition.
What you will need:
1 pkg. yellow cake mix
2 cups cold milk
1 1/4 cups water
2 pkg. lemon flavor instant pudding
1/3 cup sugar
2 tbsp. powdered sugar
2 tbsp. lemon juice, optional (I used it and added to the pudding)
What you do:
Preheat oven to 350 degrees. Prepare cake batter as directed on package. Pour into greased 9x13 baking dish; set aside.
Pour milk and water into large bowl. Add dry pudding mixes and granulated sugar. Beat with wire whisk 2 min. or until well blended. Pour over batter. (this can be tricky as the pudding wants to sink, try dropping spoonfuls randomly all over the batter if pouring doesn't work.) Place baking dish on baking sheet to catch any sauce that might bubble over side of dish as dessert bakes.
Bake 55 min. to 1 hour or until wooden toothpick inserted in center of cake commes out clean. The pudding magically goes to the bottom during cooking time! Cool 20 min. (Sauce will thicken slightly as it cools) Sprinkle with powdered sugar. Spoon into serving dishes to serve warm. Store leftovers in refrigerator.
*I made this for my daughter, Becca's birthday. It was a huge hit. If you love warm pudding and love lemon, this is a must have recipe!! The thing I love about it is, no frosting! (I am not a frosting fan :P )*
A Great Start
I love having a counter on this site. Every time I see that number go up, I am motivated to add more recipes. Thanks for all the support. I have always wanted to make my own cookbook and this is the next best thing. Feel free to comment if you try any of the recipes. Cooking is my passion and I would love to hear your thoughts.
I also hope to add little tips mingled through out the recipe posts. Keep checking back to see what tips I have added. I am just organizing them in logical categories before I start posting random thoughts.
I also hope to add little tips mingled through out the recipe posts. Keep checking back to see what tips I have added. I am just organizing them in logical categories before I start posting random thoughts.
Monday, February 25, 2008
Good Eats Guaquamole
My all time favorite cooking show is Good Eats on the food network. I got this recipe from that show and have not changed even one little thing, it is that good. I hope you enjoy.
What you will need:
3 avacados
2 roma tomatoes - seeded & chopped
1/2 seeded jalapino, chopped
1 lg. clove garlic, chopped
1/2 tsp. kosher salt
1/2 tsp. cumin
1/4 tsp. cayenne pepper
Juice of One Lime
What you do:
Remove peel from 3 avacados. Cover with lime juice to prevent browning. Pour excess juice from avacados into separate containers. Add salt, cumin and cayenne pepper. Mash with a potato masher leaving chunks. Add tomato, jalapino, garlic and some of the reserved lime juice. Mix together. Cover with plastic wrap and let flavors meld in a cool but not refrigerated place for 2 hours, then taste and add more salt or lime juice as needed.
Sunday, February 24, 2008
Chicken Lo Mein
There are actually very few recipes that I make up from nothing. I usually find a recipe and then adjust it until I like it. This one, I am proud to call my very own that I made up from scratch (well, just by imagining how the lo meins tasted at restruants I have been to). We love it, I hope you do too.
What you will need:
Chicken
Teriyaki Sauce (I use Lawrys Teriyaki Marinade)
Pampered Chef Asian Seasoning Mix
Angel Hair Pasta
Broccoli
Onion
Carrot
Bean Sprouts
Here's what you do:
Cook chicken until browned on outside. Cut into chunks. Continue to cook chicken adding seasoning mix to lightly coat chicken. Remove from pan and set aside. Boil water for pasta. Cut vegies into small pieces. Saute them until tender in pan used for chicken. Set aside. Cook pasta. Drain pasta and add to chicken pan. Coat in terryiki sauce, making it as saucy as you desire. Add more asian seasoning, according to your taste. Add chicken and vegies back and mix together. Heat through. You may need to add salt and pepper according to your own taste.
Friday, February 22, 2008
Peanut Butter Rice Krispy Treats

This is not your typical rice krispy treat recipe. Most people call this by a different name, but this is the rice krispy treat recipe that I grew up with.
What you do
Bring to a boil:
1 cup Karo syrup
1 cup sugar
Remove from heat and add:
1 cup peanut butter
Stir until well mixed and add:
6 cups Rice Krispys
Stir until coated. Press into a bar pan.
Frosting:
1 cup butterscotch chips
1 cup milk chocolate chips
Melt together and spread on rice krispys.


Fritoes and Rice

I have certain recipes that I call "poor man meals" because they are inexpensive to make. This is one of those. Don't let that name deceive you, this is pretty darn good and has impressed many people.
What you will need:
1 lb. lean ground beef
1 14.5 oz. can diced tomatoes
brown rice
1 bag fritoes
salt
pepper
onion powder
garlic powder
cheddar cheese
Cook rice according to package directions. Brown ground beef. Add diced tomatoes and seasonings to taste. Let simmer until tomatoes have broken down and sauce has thickened.
To serve:
Place a handful of fritoes in bottom of a bowl, top with rice (this is a protective coating so fritoes don't get soggy too fast), add beef/tomato mixture and then top with grated cheese.

This is my attempt to show you the layers. I used a glass bowl so you could see, but I didn't take into account that the heat from the sauce would cause so much condensation on the side of the bowl. Just realize that you don't add water to the dish. :)
Pretty Pink Salad
This is one of my traditional thanksgiving side dishes. I love this salad. I need to remember to make it more often during the year.
Here is what you will need:
1 sm. pkg. cherry jello
1 cup hot water
1 cup evaporate milk
1 cup miracle whip salad dressing
2 cups cottage cheese
1 8 oz. can crushed pineapple, drained
Mix jello and water until jello is dissolved. Let cool slightly. Add miracle whip and evaporated milk. Stir well. Mix in cottage cheese and pineapple. Chill until set.
Applesauce Cookies
This is the cookie recipe that my mom made when I was growing up. So yummy!!
What you will need to do
Mix and set aside:
2 cups applesauce
2 tsp baking soda
Cream:
1 cup shortening
2 cups sugar
3 eggs
Add:
4 cups flour
1 tsp salt
Applesauce and soda mixture
1 tsp each cinnamon, cloves and nutmeg
Mix and add:
1 cup rolled oats (I usually add a little more)
1 bag chocolate chips
OR
Raisens or nuts
Drop by spoonful on cookie sheet and bake at 375 degrees for 15 minutes
Chocolate Chip Cookies
I got this recipe from my sister-in-law, KayLynn. At the time she gave it to me, I had no clue that it was the best chocolate chip cookie recipe in the world!! Hope you enjoy.
What you will need:
2/3 cup shortening
2/3 cup margarine
2 eggs
1 cup brown sugar
1 cup white sugar
1 tsp salt
1 tsp baking soda
1 tsp vanilla
3 1/2 cups flour
2 cups chocolate chips
Mix margarine, shortening and sugar in a mixer until creamy. Add eggs and mix well. Add salt, baking soda and vanilla until incorporated. Add flour, one cup at a time until well mixed. Add chocolate chips. Spoon onto cookie sheet and bake at 375 degrees for 8-10 minutes. Remove from oven just before center is set. Let finish cooking on cookie sheet for 2-3 minutes before moving to a cooling rack.
Thursday, February 21, 2008
Taco Soup

This recipe is super easy. Just open and dump in a pot.
Here is what you will need:
1 can corn w/ liquid
1 can chili
1/2 onion, chopped
1 pkg. taco seasoning
1 can stewed tomatoes
1 can tomato sauce
1 can sliced olives, drained
Dump all ingredients in a sauce pan. Heat until onions are tender. Serve with tortilla chips, sour cream, cheddar cheese, and french bread.
Orange Jello Salad
I got this recipe from a sweet lady who brought it to me after I had our last baby. I LOVE IT!! Enjoy!
Here is what you will need:
1 pkg. orange Jello
1 pkg. regular tapioca pudding (not instant)
1 pkg. regular vanilla pudding (not instant)
3 cups boiling water
2 cups cool whip
1 can mandarin oranges, drained
Cook together the Jello, pudding and water until thick. Let cool and fold in the cool whip. Add the oranges. Pour into a bowl and refrigerate until set.
Funeral Potatoes
I am posting this recipe because every year at christmas time either my sister or my mom calls and asks me for it.
All ingredients are aproximate... I go by looks.
1-2 bags frozen hash brown potatoes
2-4 cans cream of chicken soup (coat hashbrowns thoroughly)
2 cups shredded cheddar cheese (again, aproximate, enough to evenly go through hasbrown mixture)
1 med container sour cream (I don't use as much sour cream as most people. You may not need it all unless you are using 4 full cans of soup)
1 onion, chopped (saute before hand to make sure it cooks all the way through or just use onion powder to taste)
Salt and Pepper to taste.
Optional toppings: Cheddar cheese, corn flakes, rice chex, crackers or none at all. I think I have tried all at different times.
I know this has no butter. I find that it tastes just as good with out the butter and really cuts down on the fat.
Cook in a 9x13 baking dish at 375 degrees for 30-45 minutes or until hasbrown are cooked through.
Cottage Meat Loaf
I got this recipe when I was in high school. It is still my favorite. It is the only meatloaf my husband likes.
What you will need:
1 1/2 lbs. lean ground beef
1/2 cup ketchup
1/3 cup tomato juice
1/2 tsp. salt
1/2 tsp. pepper
1/8 tsp. red pepper
2 eggs, beaten
3/4 cup bread crumbs
1/4 cup chopped onion
2 tsp. mustard
Topping:
1/4 cup ketchup
1/2 tsp. mustard
2 tsp. brown sugar
In a large bowl mix all ingredients except ground beef. Add ground beef. Mix gently but thoroughly.
Now, you can add this to any pan you want. A loaf pan means a longer cooking time. I usually put the meat in a circular baking stone and make a wreath shape out of the meat. You can do it in any pan you would like. Spread topping on top.
Bake at 400 degrees until no longer pink in the middle.
Yogurt Salad
Here is what you will need:
1 large container of your favorite flavor yogurt (we use raspberry)
1 container of cool whip
1 bag frozen raspberries slightly thawed (or fruit to match yogurt flavor)
Mix full container of cool whip and enough yogurt to your liking (I usually use 3/4 to full container) Add raspberries and stir to let the dark red juice leave streaks in yogurt mix.
*Some people put this in a graham cracker crust and freeze it to make a pie.
**If you are on a budget, omit the frozen raspberries... we do all the time and it is still yummy
Pesto Pasta
I got this recipe from my friend Marcy a long time ago. I have changed it up quite a bit, including the name, but I still think of it as her recipe.
What you will need:
2 tlbs dried basil
1 cup mayo
4 tlbs grated parmesian cheese
2 tlbs lemon juice
1 tsp salt
1/4 tsp red pepper
1/4 tsp black pepper
Blend above ingredients in a blender. Start a large stockpot of water to bring to boiling.
2-4 carrots, cut in pieces
1 med onion, chopped
1 med yellow squash, cut in half moons
1 jar of artichoke hearts in water, drained and cut in small pieces
Saute veggies until tender. Remove from pan and set aside.
You will also need:
3-4 chicken breasts
1 box linguini
Add 3-4 chicken breasts to pan and cook until no longer pink. Remove from pan and cut into bite sized pieces. When water is boiling, add one box of linguini. When linguini is tender, drain and add pasta back to stockpot. Add veggies and chicken to pasta. Add sauce from blender to the pasta. Mix together well.
*I serve this with yogurt salad since my protien and veggies are already in this dish. It adds variety and fruit. I also serve with french bread.
Chicken Jambalaya
 This isn't the greatest picture, it was my first time taking pictures of food and even now I am still trying to get food to look great on film. Next time I make this for dinner I will try to take a better picture, until then I hope you use your creative little brain to imagine how delicious this dish is.
This was a free recipe (slightly altered) from savingdinner.com
What you will need:
1 tlbs butter + 1 tsp olive oil
2 med onions, chopped
1 med stalk celery, chopped (yes that is the whole thing, not just one rib)
1 green bell pepper, seeded and chopped
3 cloves garlic, pressed
1 lb chicken breast, cubbed
1 can chicken broth
3/4 tsp dried basil
3/4 tsp dried thyme
1/4 tsp pepper
few shakes of Tabasco sauce
2 bay leaves
1 14.5 oz. can diced tomatoes
In a 3-quart saucepan, melt butter and oil over medium-high heat. Cook onion, celery, bell pepper and garlic, stirring frequently, till onion is tender. Remove from skillet and set aside. Add chicken to skillet and stir-fry till lightly browned. Remove from skillet and set aside. Add broth, seasonings and diced tomatoes to skillet. Heat to boiling, scraping up all the browned bits fromt he bottom of the pan. Return veggies and chicken to skillet. Reduce heat, cover and simmer for 5 minutes. Remove from heat. Serve over brown rice.
Two Bean Enchilazagne

What you will need:
Two mixing bowls, one crockpot or casserole dish if you don't have a crockpot.
In one bowl mix the following ingredients:
1 sm. can red enchalada sauce
1 sm. can green enchalada sauce
1 cup salsa
1 tlbs cumin
2 cloves garlic, crushed
In second bowl mix the following ingredients:
1 can black beans, drained and rinsed
1 can pinto beans, drained and rinsed
1 can green chilis
One pkg. spanish rice cooked according to pkg. directions
1 small onion chopped
Additional ingredients:
Corn Tortillas, cut into wedges like a pizza (I use aprox. 12-14)
Cheddar Cheese, grated (I use aprox. 1-2 cups)
Sour Cream, for topping once served
What you do:
Set up an assembly line around the crock pot. On the bottom of the crock pot spoon a small amount of sauce mixture from bowl one. Place corn tortilla wedges on the bottom of the crock pot to cover the bottom. Add enough of the bean mixture from bowl two to cover the tortillas. Add more sauce then top with cheese. Layer more tortillas, beans, sauce and cheese until you have used up all the ingredients. Cook on low 4-6 hours or until hot and bubbly all the way through.
*This is great with corn bread. I also serve with a jello or fruit salad.
Subscribe to:
Posts (Atom)


